


The Potential V3 is a spacious and water-resistant backpack fitted with the latest weight and temperature distributing technology. The perfect daily driver for the short stop and the long haul like.
FABRIC: MASTERTEX-07 CORDURA Ballistic Nylon
COLOUR: Olive
DETAILS:
-Water resistant, including zips
-Outlast® straps and rear panel
-Padded and adjustable shoulder straps
-‘M-strap’ technology reduces weight stress on shoulders
-Carry handle
-Main zip compartment
-Zippered front pouch
-Waterproof side entry zip to main compartment
-Hidden rear zip compartment
-Interior zip compartment
-Veg-tanned leather trimmings
-Metal hardware
-Leather branded patch
-Signature brass buckle fastener on front
-Approximate Dimensions: H46cm x W33cm x D18cm
ORIGIN: Made in Japan
The Potential V3 Backpack from Master-Piece is an impressive blend of traditional aesthetics and cutting-edge technology. The spacious main compartment is protected by a water resistant zip closure. The body is constructed from a leather-trimmed, 3-layer CORDURA® ballistic nylon which is both highly durable and water resistant. The straps and rear panel - where the bag is in contact with the body - are made from Outlast® temperature regulating material developed for NASA to keep you warm or cool as the situation requires. The Potential V3 also comes equipped with Master-Piece's ‘M-Strap’ technology, which distributes shoulder weight more evenly to lighten the load on those heavier carries and longer hauls.
FREE UK delivery on orders over £50.
Shipping costs £8 to UK addresses for orders under £50.
For international orders, please see our full shipping and delivery details.
FREE European delivery on orders over €200.
Standard delivery is €30 for European orders under €200
For further information, please see our full shipping and delivery details.
FREE delivery worldwide on orders over $200.
Shipping costs $25 for orders under $200
Orders to USA, Canada, Mexico & Far East - 2 working days. (Next working day to NYC).
Australia and New Zealand - 3-4 working days.
For international orders, please see our full shipping and delivery details.
If you are not completely satisfied with your purchase, you can return it to us within 21 days for an exchange or refund.
For more information, please see our Returns & Exchanges page.

Stage 1: The waist
- Button up the jean.
- Lay flat with the top waist band evenly flat on the back waist band.
- Measure from one side to the other keeping the jean flat & double the measurement.


Stage 2: The hip
- Measure 3 inches or 7.5cm from the crotch stitch.
- Measure from side to side flat across the jean at this point.

Stage 3: Front rise
- Lay flat and measure from crotch seam to top of jean with top button fastened

Stage 4: Back rise
- Measure from crotch seam to top of the back of the jean.

Stage 5: Thigh
- Lay flat and measure from crotch across to outside of leg.


Stage 6: Knee
- Lay flat and measure 13” or 33cm from crotch down inside seam of jeans
- From here measure from one side of the jean to the other.

Stage 7: hem width/leg opening
- With the jean flat measure from one side of the leg opening to the other.
- NB with very heavy denim 18oz and above measure the entire circumference of the exterior of the hem using a measuring tape and divide by 2 for a more exact figure.

Stage 8: Inseam/inside leg
- Lay the jean flat with the inseam at the centre.
- Following the inside seam measure from the crotch to the end of the leg.
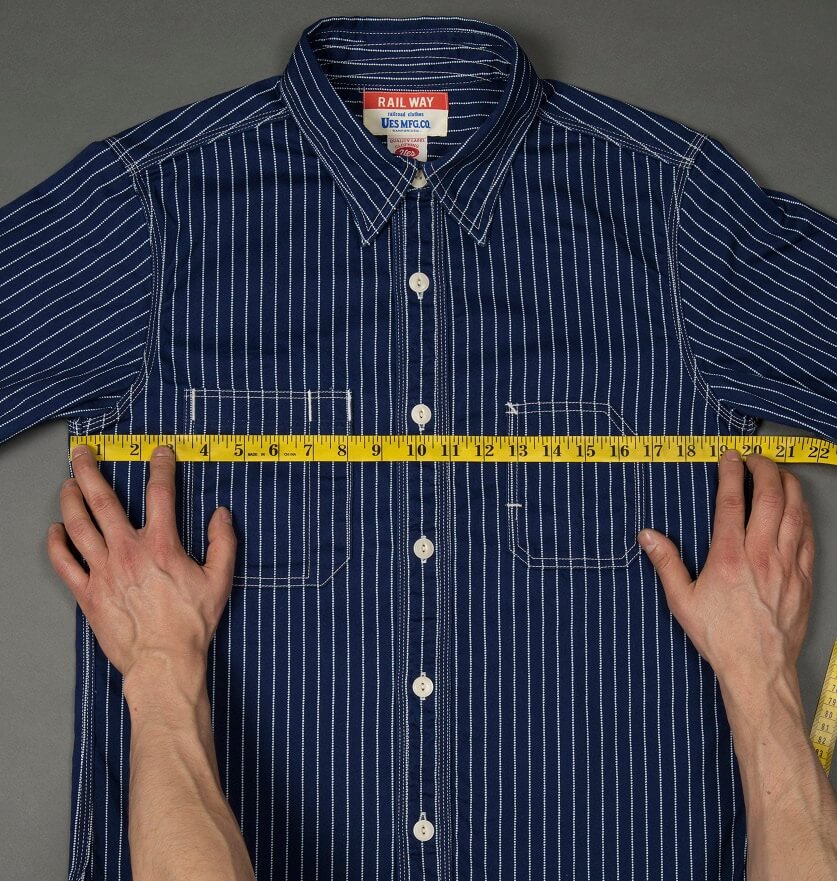
Stage 1: Chest
- Measure from pit to pit and double the reading.
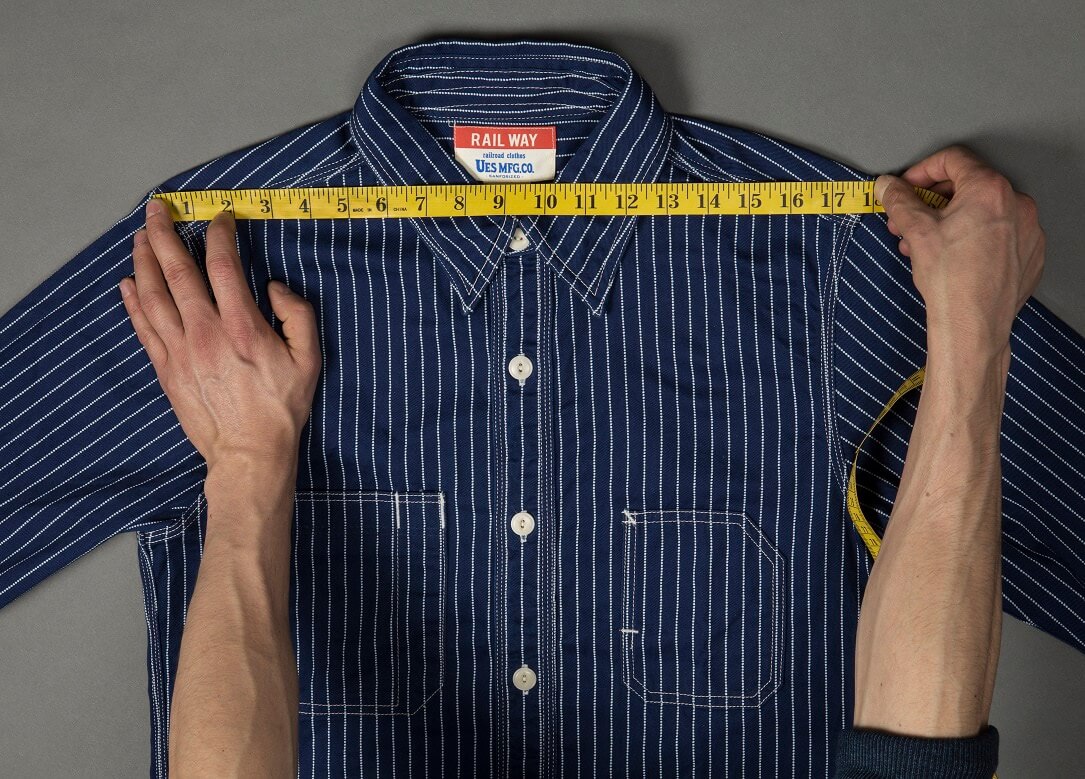
Stage 2: Shoulder
>Measure across the top from one shoulder seam to the other.
Stage 3: Waist
We measure the narrowest part of the garment outer seam to outer seam between the pit and the opening. If, however, the shirt has gussets, the waist will correspond to the the opening measurement.
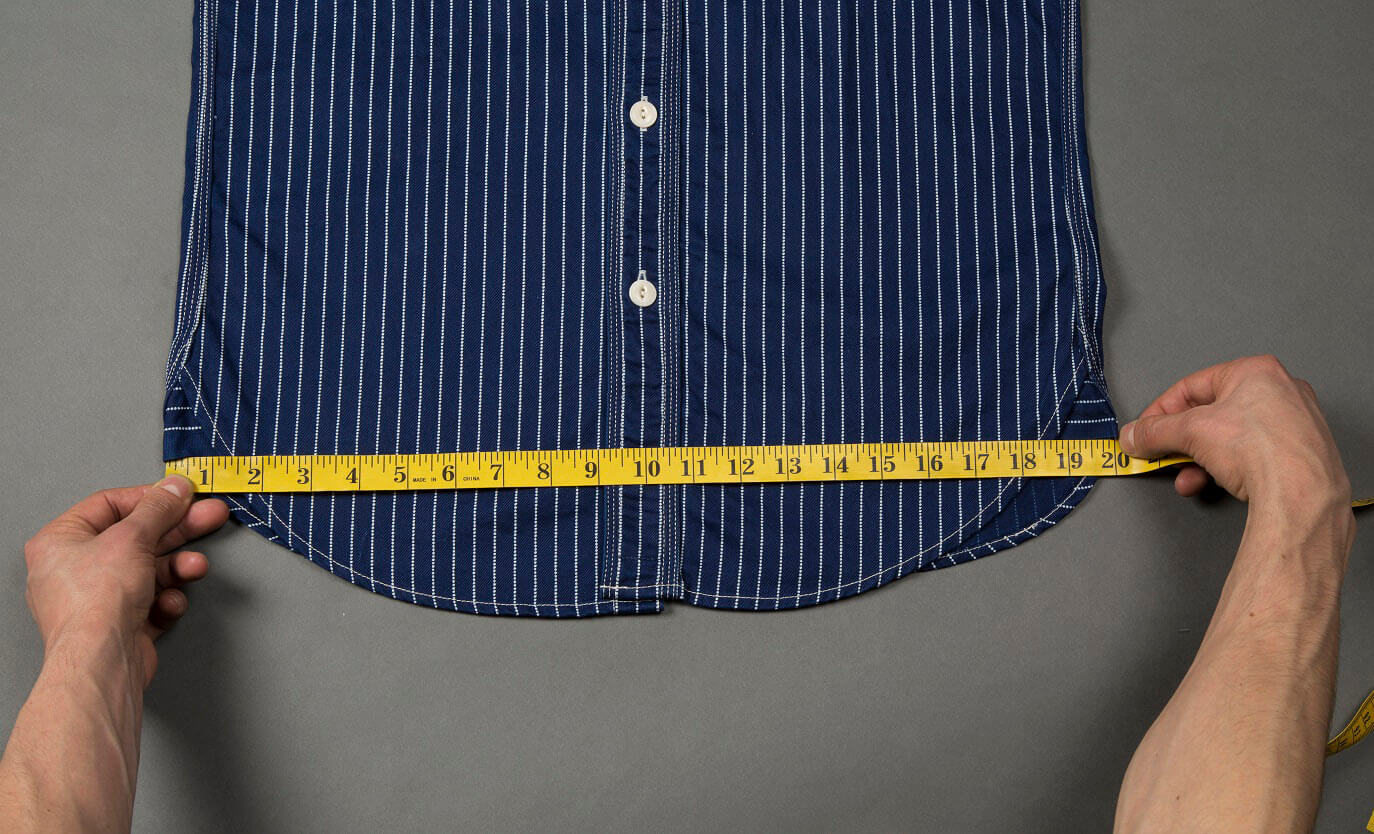
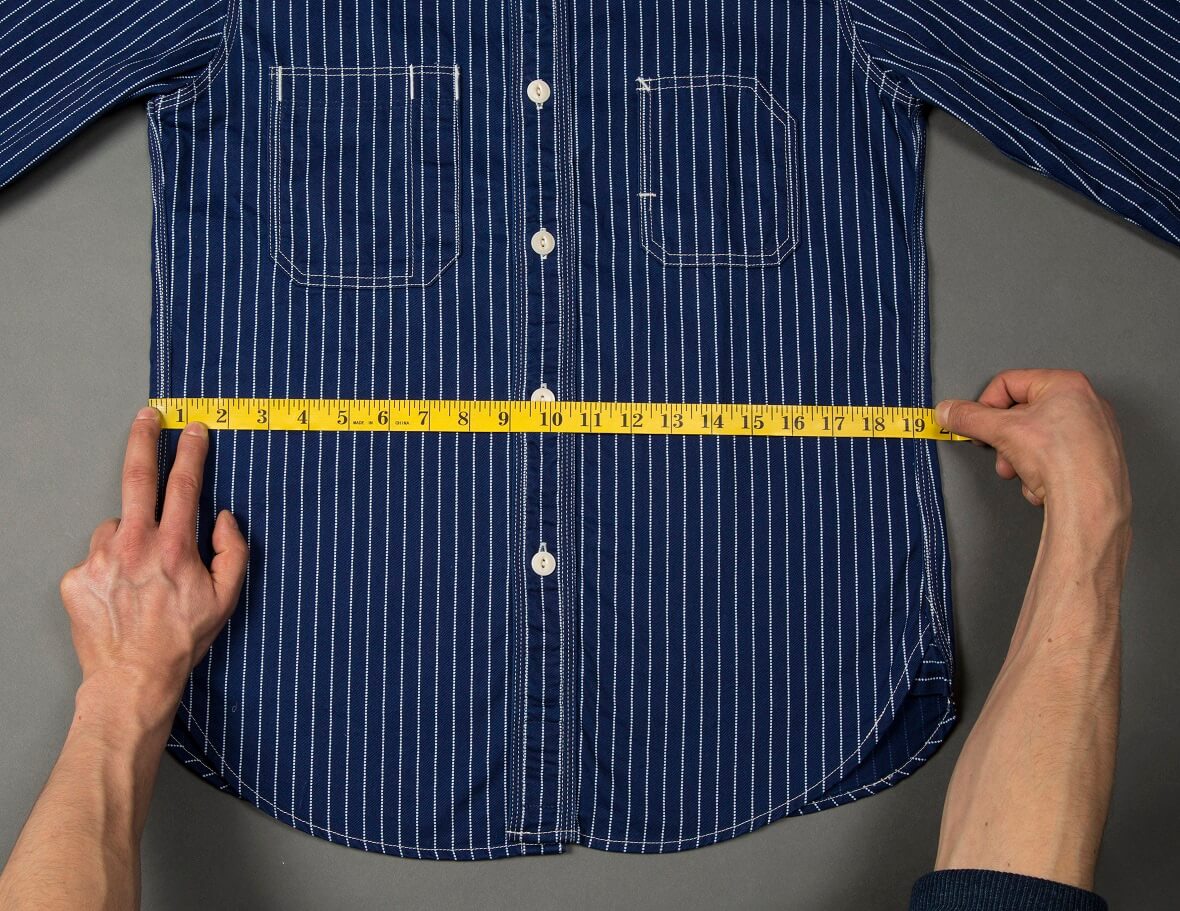
Stage 4: Opening
Here we take a cross measurement from seam to seam at the bottom of the shirt.
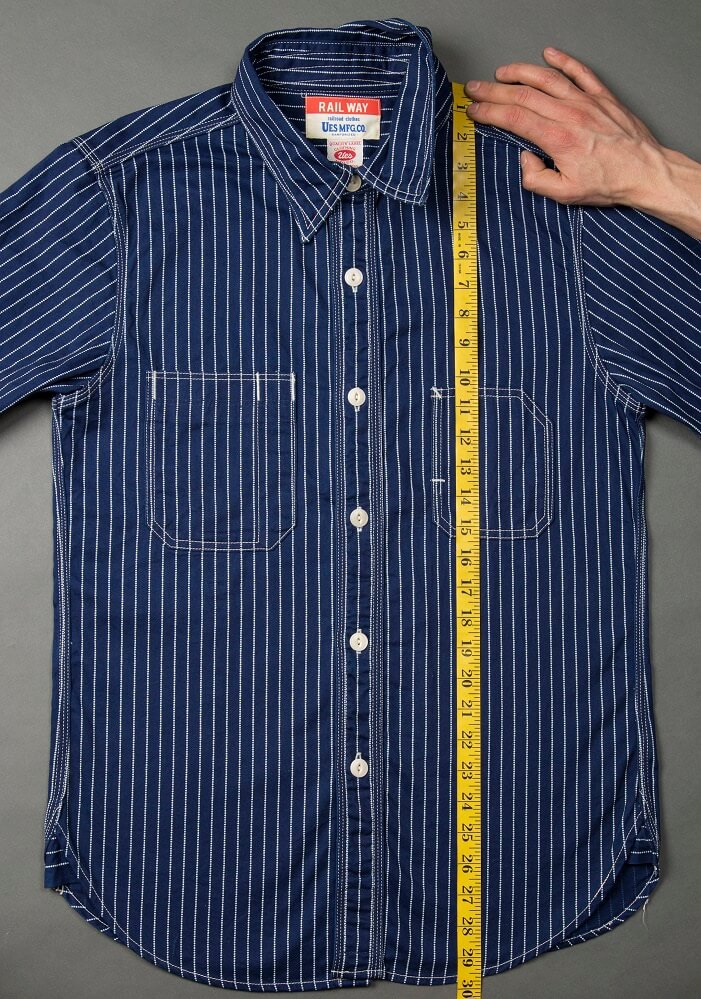
Stage 5: Length
Measure from the top of the shoulder by the collar to the bottom of the garment.
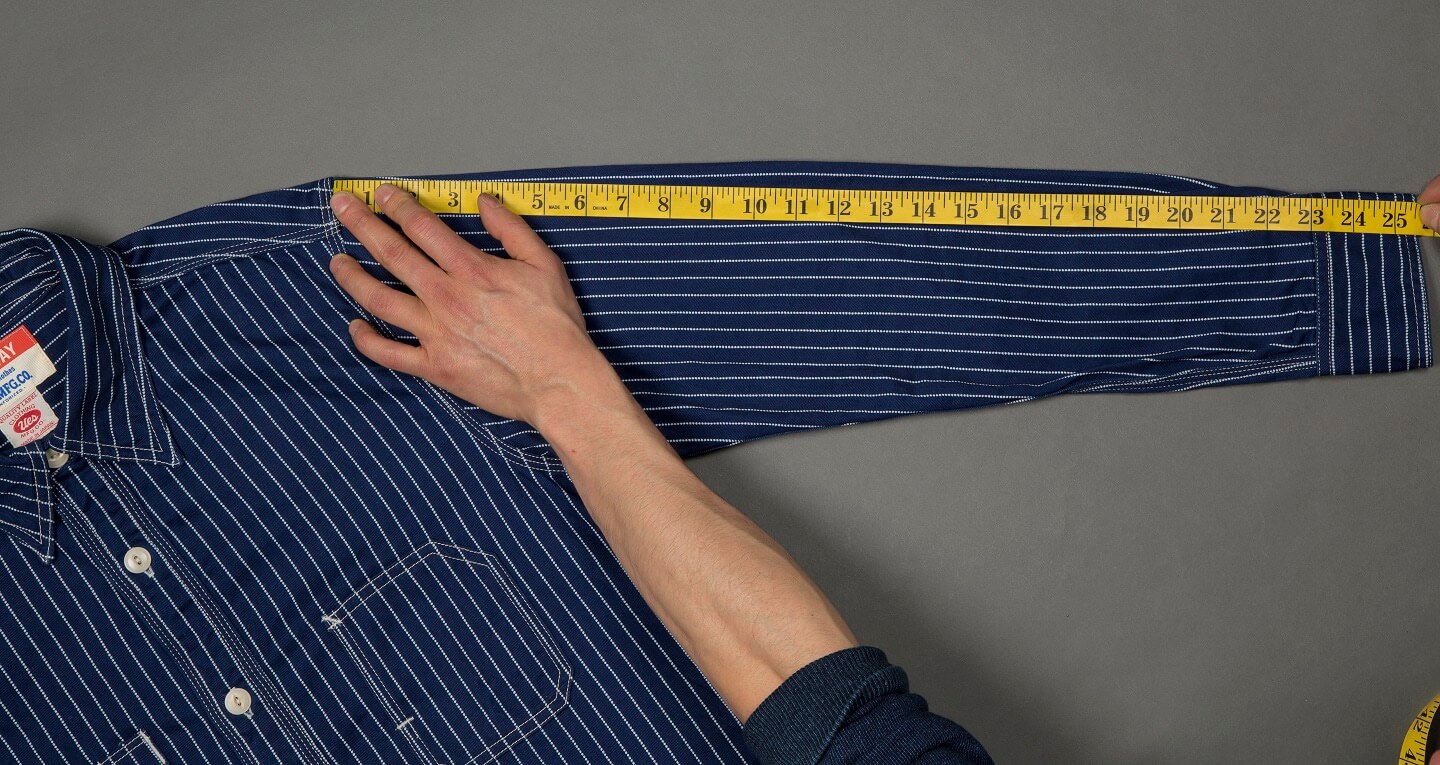
Stage 6: Sleeve
Measure from the top of shoulder seam to the cuff’s edge.